This article looks at using sprues that accumulate in a seemingly endless supply. The obvious use is as a stick of some sort and I don’t disappoint because that’s what I did. I also made a plant out of sprue so that should be worth a read.
 |
Fun with Sprues
There are two main problems with plastic minis.
- You end up with the plastic sprues cluttering up everything.
- Minis getting lost on the battle field.
|
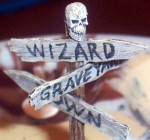
| Lets address both problems with one project: A sprue sign post. |
Parts List:
- Sprue
- Sheet Styrene (Plastruct)
- Spackling Compound
(I use DryDex)
- PolyStyrene Cement (Plastic Glue)
- Plastic Skull
- GW 25mm Slotta Base
- Flock
- Static Grass
|
|
The first step is clipping off a straight section of sprue the height of the finished sign (I guessed and did 3 inches). Dont worry about being neat. Using an X-acto Knife and cutting carefully away from you, shape the trapezoidal sprue into a random (read messy) log shape. If you cut yourself, dont blame me… you were warned.I also carved a Sprue Flower but the pictures didnt turn out. Ill write those instructions another time. |
 Stick the stick and the sprue flower to the GW Base. I also put extra bits of sprue into the slot for strength. A good coating of glue fuses everything together. Stick the stick and the sprue flower to the GW Base. I also put extra bits of sprue into the slot for strength. A good coating of glue fuses everything together. The signs where cut from 0.75mm Sheet Styrene with scissors. I then randomized the edges with the X-acto knife by shaving both edges. I then scored 3 roughly equidistant lines along the length of the face of the sign and again on the back of each sign with a pointy stick (a carving tool) as the knife would make lines that are too fine. I also chose Styrene over balsa for strength. The glue actually melts the plastic pieces together. The signs where cut from 0.75mm Sheet Styrene with scissors. I then randomized the edges with the X-acto knife by shaving both edges. I then scored 3 roughly equidistant lines along the length of the face of the sign and again on the back of each sign with a pointy stick (a carving tool) as the knife would make lines that are too fine. I also chose Styrene over balsa for strength. The glue actually melts the plastic pieces together. |
  Next I smooshed spackling compound onto the base in a “rough ground” type of way. The DryDex starts pink but turns white when dry. I then sprayed the whole thing black and ink washed it to fill in the gaps.I thought that the post was missing something so I clipped a bit off the top to expose raw sprue and stuck a GW skull to the top and painted it black. Next I smooshed spackling compound onto the base in a “rough ground” type of way. The DryDex starts pink but turns white when dry. I then sprayed the whole thing black and ink washed it to fill in the gaps.I thought that the post was missing something so I clipped a bit off the top to expose raw sprue and stuck a GW skull to the top and painted it black. |
  I did an over brush of Charred Brown and painted the sprue flower a coating of Dark Green. Everything (except the flower) was given a wash of brown ink. I know the pics look similar but the ink wash give the brown some depth. I did an over brush of Charred Brown and painted the sprue flower a coating of Dark Green. Everything (except the flower) was given a wash of brown ink. I know the pics look similar but the ink wash give the brown some depth. 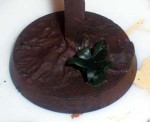 I ignore the sprue flower until right near the end. Here’s a close up of it anyway. I ignore the sprue flower until right near the end. Here’s a close up of it anyway. |
 I now give the whole thing a dry brush of Cobra Leather. Since this is the dominant ground color, I use a wet brush (normal paint load) on the slotta base sides. Im not worried about the base of the flower as Ill fix the over-runs later. I now give the whole thing a dry brush of Cobra Leather. Since this is the dominant ground color, I use a wet brush (normal paint load) on the slotta base sides. Im not worried about the base of the flower as Ill fix the over-runs later. |
 I dry brush Bonewhite over the whole model, including the ground. I keep it fairly light on the post and ground but build up several layers on the signs and skull. This is because you want them to be lighter and Ill make them lighter still in a minute. I dry brush Bonewhite over the whole model, including the ground. I keep it fairly light on the post and ground but build up several layers on the signs and skull. This is because you want them to be lighter and Ill make them lighter still in a minute. The bonewhite is too harsh by itself so I give the pole and the ground (only) a wash of very watered down ink (a 10-1 mix?). I touch the brush to a paper towel to suck up most of the wetness. I want to dull the bonewhite, I dont want to soak the figure. The bonewhite is too harsh by itself so I give the pole and the ground (only) a wash of very watered down ink (a 10-1 mix?). I touch the brush to a paper towel to suck up most of the wetness. I want to dull the bonewhite, I dont want to soak the figure. |
 Time to give the boards and skull a dry brushing of… can you guess? Yup. Skull White. Not much to do except build it up to a whiteness that you are happy with but dont overdo it. Time to give the boards and skull a dry brushing of… can you guess? Yup. Skull White. Not much to do except build it up to a whiteness that you are happy with but dont overdo it. Well, Ive avoided it as long as I could. Time to do the flower. I touch up the bottom and underneath with Dark Green (the original base color) and then never touch the base again. I paint the top of the leaves Goblin Green and then take a heavy blob of Bad Moon Yellow and dab it in the center. I draw up yellow lines in the center of each leaf. Lastly, I take Scorpy Green and edge each leaf. Well, Ive avoided it as long as I could. Time to do the flower. I touch up the bottom and underneath with Dark Green (the original base color) and then never touch the base again. I paint the top of the leaves Goblin Green and then take a heavy blob of Bad Moon Yellow and dab it in the center. I draw up yellow lines in the center of each leaf. Lastly, I take Scorpy Green and edge each leaf. 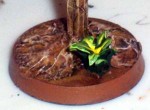 Ok. I know its more of a “plant” than a “flower” but remember, it started life as a section of sprue. Ok. I know its more of a “plant” than a “flower” but remember, it started life as a section of sprue. |
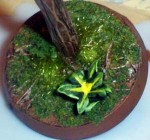 To flock the base, I paint on an mix of water and white glue. I don’t even try to cover the whole base. Real ground has bare patches so, unless you are modeling a Golf Course, don’t cover every square mm of ground with flock. Right at the base of the pole I add a couple of tufts of static grass… To flock the base, I paint on an mix of water and white glue. I don’t even try to cover the whole base. Real ground has bare patches so, unless you are modeling a Golf Course, don’t cover every square mm of ground with flock. Right at the base of the pole I add a couple of tufts of static grass… |
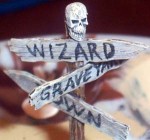 To make a sign a sign, it has to have words on it. I used a pencil and lightly wrote on the boards. Taking a fine brush I load it with Coal Black paint straight out of the bottle (I don’t want it to flow, run, blend, etc.) Holding my breath, I carefully trace my pencil marks. Why hold my breath? Hold over from my sharp shooting days. Hold your breath, SQUEEEEEZE the trigger. The black paint is much too black to look good. I do a quick dry brush of Bonewhite over the words to age them. Another way of lettering would have been to do the black writing and then, using a thinner line and a steadier hand, retrace the center of the letters with Skull White.Well, thats it. No more lost minis on the battle field. To make a sign a sign, it has to have words on it. I used a pencil and lightly wrote on the boards. Taking a fine brush I load it with Coal Black paint straight out of the bottle (I don’t want it to flow, run, blend, etc.) Holding my breath, I carefully trace my pencil marks. Why hold my breath? Hold over from my sharp shooting days. Hold your breath, SQUEEEEEZE the trigger. The black paint is much too black to look good. I do a quick dry brush of Bonewhite over the words to age them. Another way of lettering would have been to do the black writing and then, using a thinner line and a steadier hand, retrace the center of the letters with Skull White.Well, thats it. No more lost minis on the battle field. |
|
Posted in Migrate, Scratch Building.
By Rob
– November 9, 2003


0 Responses
Stay in touch with the conversation, subscribe to the RSS feed for comments on this post.
You must be logged in to post a comment.